
I enjoyed a hot mug of lemon
tea this morning; and watched Pt. 2 of Jesus of Nazareth … and worked up
another of my own designs: I wanted a new book cover since books have become my
main companion since Bob’s spirit stepped off Earth – I’ll probably craft a
slew of them to match seasons, clothes, purses, ect.


I’ve become known as ‘the
Book Lady’ around restaurants in town … and just as I wouldn’t wear the same
outfit every week, my latest read shouldn’t be seen in the same cover, either: told’ya
I’m weird 😉

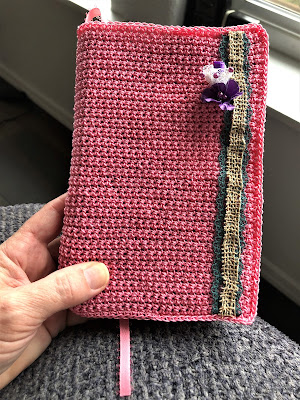
I designed and crafted this
book cover about 25 years ago; but I am working on a new cover, so I thought I’d
share the pattern 😊

It’s simple.
It’s quick.
It’s easily adaptable.
This book cover
can be finished with a sc page marker … or a satin ribbon marker, sewed in
place.
I am using my original chicken scratch
written instructions, so I hope it will not be too confusing. Let me know if
you have trouble, and I will answer your questions.
Materials: #10 Aunt Lydia’s Crochet Cotton Thread, #0
Crochet Hook, trims (optional), coordinating sewing thread if using trims,
11½” satin ribbon (optional), sewing pins, sewing needle, small amount
of contrasting throw-away thread, tapestry needle.
Sts Used:
Ch = chain
Sc = single crochet
CC = contrasting
St = stitch
Ct = count
EO = end off/cut
thread.
Row 1: Begin by making an 85 st foundation chain of
sc; ch 1, turn.
Row 2: Sc across row (84 sts); ch 1, turn.
Repeat row 2 for a total
of 54 rows (or length needed for your book cover – some books are
higher, some are lower). DO NOT CUT THREAD – loosely tie end,
because you will be using it again.
With CC thread and tapestry
needle; count 14 sts from each end, and fold those inwards for the cover lapels
(to hold book in place).
If you plan on using trims, place
a book into the cover – fold ends inward, and mark the fold with CC thread:
also mark the front spine edge – being careful not to untie/unravel the
loosely tied end-of-row thread: this will help you accurately place the desired
trim where you want it (centered – or towards the front edge) without the
trim being ‘off kilter’ when the cover is finished and your book is in place
inside.

Once you are satisfied with
the trim placements, if you use them, pin them in place and tack them
down kinda loosely with a swing needle and matching thread – books tend to
stretch the cover a bit, you want the finish to look tidy, not stressed.

Go back to the loosely tied
end-of-row thread: pickup st, and sc through both top st’s of book cover …
and the 14-ct. cover lapel sts.; then sc around entire cover (repeating lapel
instructions for second lapel) – and making a **crochet
marker** at the center, where the spine center would
be: sl st back up the maker foundation, and continue to sc edging pickup
point, and EO.
Weave in loose ends.
**Sew the satin ribbon marker to the center top
of the book cover AFTER EDGING S COMPLETED, if using that option. **

Ta-da! All done: enjoy! 😊

Beautiful book cover!
ReplyDeleteThank you - and thanks for stopping in :-)
DeleteSuch a lovely book cover, thanks for the pattern and thanks for sharing with us at Handmade Monday. I did share on our Handmade Monday fb page but couldn't find you on fb to tag you, sorry :-)
ReplyDeleteThank you :-)
DeleteSorry about that, but my FB Page is set to private ;-)
I am quite confidently weird. :) Thanks for sharing at My Big Fat Menopausal LIfe's Share the Wealth party. Hope the rest of your week is fabulous!
ReplyDeleteThanks for stopping by :-)
ReplyDeleteEnjoy the rest of your week!