
This recipe is from my ‘Fannie Farmer Baking
Book’ cookbook and makes a wonderfully fluffy white bread that will not fall
apart when handled. This recipe makes a classic American white bread, in the
rectangular loaf shape, which is delicious for sandwiches, toast, toasted
cheese sandwiches, and to eat plain with butter with meals. It is a well-balanced
loaf; the small amounts of sugar and salt called for bring out its natural
flavor, and the milk tenderizes it, keeping it fluffy.
NOTE: Bread takes T.I.M.E. to prepare,
so be prepared to spend MOST OF YOUR DAY in the kitchen …
EQUIPMENT NEEDED: A saucepan of
at least 1-qt. capacity; a mixing bowl of at least 6-qt. capacity; a liquid
measure of at least 1-qt. capacity; a set of dry measures; a set of measuring
spoons; a smooth, flat kneading surface – like a board, a countertop, or marble
slab; a dough scraper or painter’s spatula; a rubber spatula; two 8-1/2 x 4-1/2
x 2-1/2” loaf pans; a cooling rack (optional);
a standing electric mixer with a dough hook (a
regular electric mixer w-dough hooks, or a food processor)
¼ cup warm Water * 1 package dry Yeast (or
2-1/4 tsp. bulk dry yeast) *
1-3/4 cups Milk (prepared dry milk will
work just fine) * 2 TBSP Butter (1/4 stick) (or vegetable shortening, or
oil) * 2 TBSP granulated white
Sugar * 2-1/2 tsp. Salt * 5-1/2 to 6-1/2 cups all-purpose Flour
Warm the water; pour into bowl and cool to a temperature
of 105-degrees. Add yeast and stir well – let stand to dissolve for about 1
minute or so.
Heat the milk to 105-degrees (be sure that it is not hotter at the bottom
of the pan), then pour it over the dissolved yeast. Add the butter (or shortening or oil), sugar, salt, and
4 cups of the flour. Beat vigorously for at least 1 minute. You will now have a
thick, rough, probably lumpy batter, not stiff enough to hold its shape outside
the bowl.
Stir in enough of the remaining flour – ½ cup
at a time – to make a stiff but not dry dough; it should collect in a damp and
shaggy mass around the dough hooks and clean itself away from the sides of the
bowl. It will definitely be cohesive enough now to hold together on the
kneading surface. You should have at least 1 cup of flour remaining to add to
the dough as you knead the dough.
Dust the kneading surface with ¼ cup of flour
and turn the dough out onto it, cleaning the bowl completely with a rubber
spatula. The dough is now ready for the comfortable, rhythmic motion of
kneading it. Bear down on the dough with the heels of your floured hands and push
it away – then fold it partially back unto itself and give the whole mass a
quarter turn; it should be soft, sticky, and quite messy, but kneading will
soon transform it into a collected ball of dough.
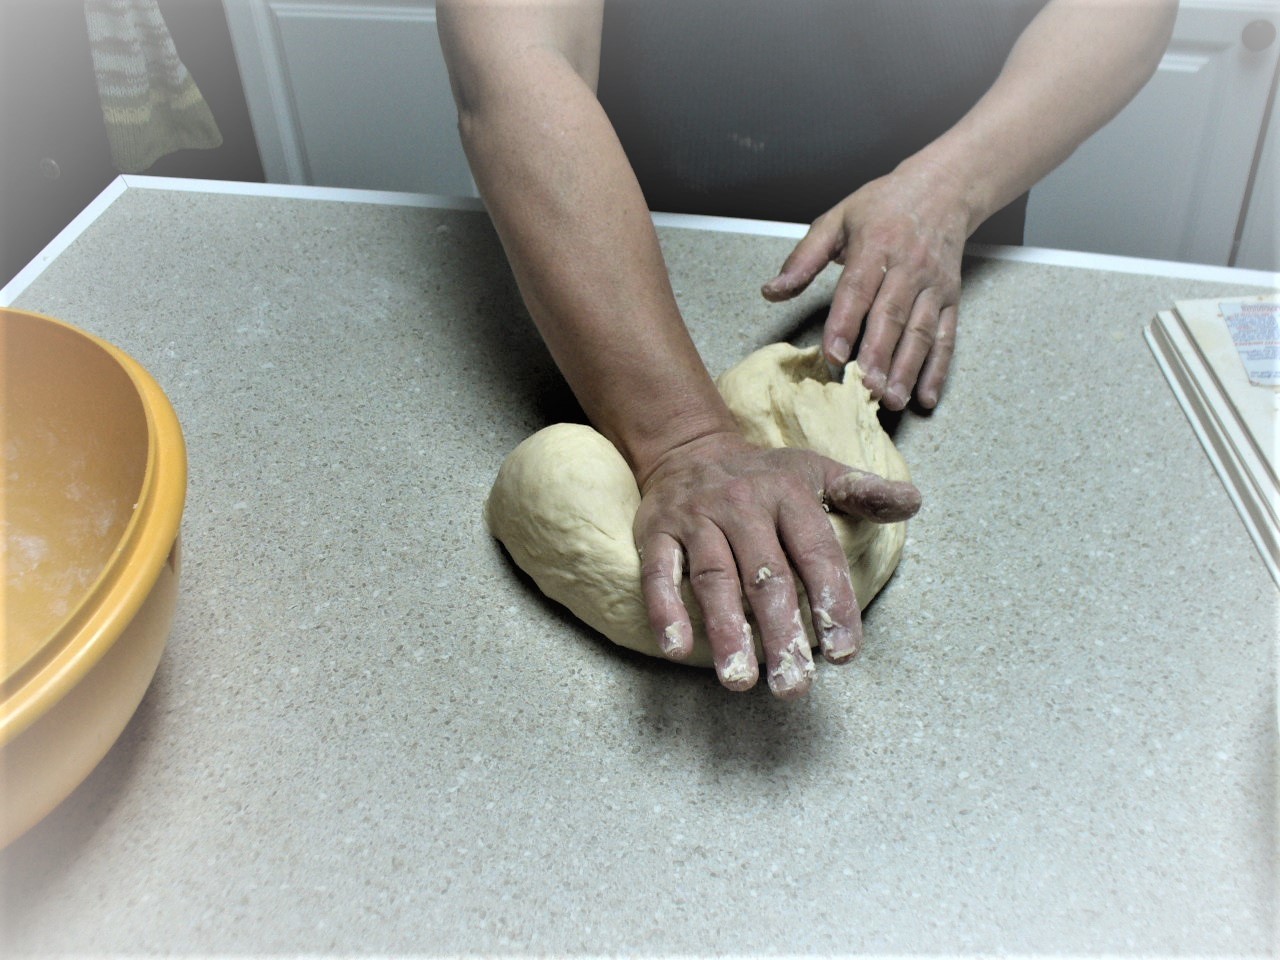
Repeat pushing, folding, and turning again
and again; using a dough scraper if you wish to clean the surface as you knead.
*I was told by a master baker
decades ago that the best way to knead bread was to work out your frustrations
on the dough as you work it … IT WORKS! Following that advice, I began turning
out beautiful loaves of bread: before I was not working the dough hard enough*
As you work, the dough will absorb the flour –
sprinkle on about 2 TBSP at a time, when necessary, to keep the dough from
being too sticky or “tacky”. After you have kneaded it for 1 minute, stop and
let the dough rest for 10 minutes to allow the flour to absorb the liquid so
further kneading is easier. (It is okay
to rest the dough longer, but if you do, cover it with an inverted bowl to
prevent a crusty skin from forming on the dough)
After the rest, resume kneading for about 6
to 8 minutes, or until the dough is smooth and elastic; when you have kneaded
enough, the dough will no longer be sticky and flaccid, but will become shiny
and resilient. Sometimes small blisters will appear on the surface – a sign
that you have kneaded enough. Test by pressing the heel of your hand firmly and
deeply into the dough – hold it there 10 seconds; if it comes away clean, that
is another sign that you have kneaded enough.
THE FIRST RISE: Allowing the dough to rise gives
it time to ferment, develop, and expand. Most recipes say to let dough rise in
a “warm place”, and 75 to 85-degrees is ideal. *I rise my bread either in the oven warmed by the interior light
bulb … or atop my dryer under a towel-covered basket while doing laundry: the
loaves rise perfectly. When my mother did her bread, she would put her loaves
atop the refrigerator, covering them loosely with a slightly damp towel so the
rising bread would not stick to the fabric*

Dough rising in the oven
Wash the mixing bowl, dry it, and grease the
inside right to the top with shortening. Put the kneaded dough into the bowl
and turn it so it is entirely coated with the shortening, which will keep the
dough surface from drying out. Cover with plastic wrap or a clean cloth and set
to rise where it won’t be disturbed, until it doubles in bulk- about 1 to 2
hours, depending on the temperature. Since rising times can vary, the best
guide is how much the dough should
rise … so, when you set it to rise, estimate how full the bowl will be when the
dough has doubled in size: judge with your eyes where the dough rests in the bowl
now and how much it should double when it is swollen and puffy.

Risen dough
PUNCHING DOWN THE DOUGH: Again, do not be gentle! After
the dough has risen, turn it out onto a lightly floured surface. Punch it,
pummel it, and knead it for about 1 minute. Do anything you have to to work out
the air and return it to its original, unleavened size before it doubled in
size.
FORMING THE LOAVES: Grease the interior of the loaf pans
thoroughly so the bread, when cooking, will not stick to the pans. Divide the
dough into two equal piece. Gently stretch the pieces as you begin to roll them
into oval loaves the approximate length of your pans. At the end of the dough,
pinch the ends closed and pinch the bottom seam together; and place in the prepared
pan, with the seam down. The dough should just touch the sides of the pan. If
it doesn’t, or the shape looks rough and uneven, push, and pat with your fist
to even it out. The pan will be filled about 2/3’s full.
Repeat for 2nd loaf.

SECOND RISE: Cover the pans with a clean
cloth or dish towel, and place them in a warm spot. Let the dough rise again.
The second rise will take about 45 minutes to 1 hour. When the dough is puffy
and swollen, and forms a dome, or ‘blossom’, over the top of the pan, it has
risen enough.

Loaves covered w-bowl rising in oven
PREHEATING THE OVEN: In the yeast-bread recipes, I
have not noticed a separate step to the instructions concerning the preheating
of the oven – primarily because it is difficult to predict exactly when the
final rise will be completed and how long your oven needs to reach the baking
temperature. Most ovens will preheat in about 10 to 15 minutes … BUT KNOW YOUR
OWN OVEN. After you have baked a few loaves, you will be able to guesstimate sufficiently
well what the loaves will look like 10 to 15 minutes before they are ready to
bake. Preheat the oven then to 350-degrees and adjust the oven rack to the
middle level. If you are not up to guessing, just preheat the oven 30 minutes
after you have formed the loaves, and the oven will surely be ready when it is
time to bake the loaves.
BAKING THE LOAVES: Uncover the pans and place the
bread on the middle rack of the oven. Almost immediately there will be a sudden
rise in the dough, known as “oven spring” – and the dough will continue to rise
a bit more. Bake for about 40 to 45 minutes in a glass pan … 45 to 50 minutes
in a metal pan.

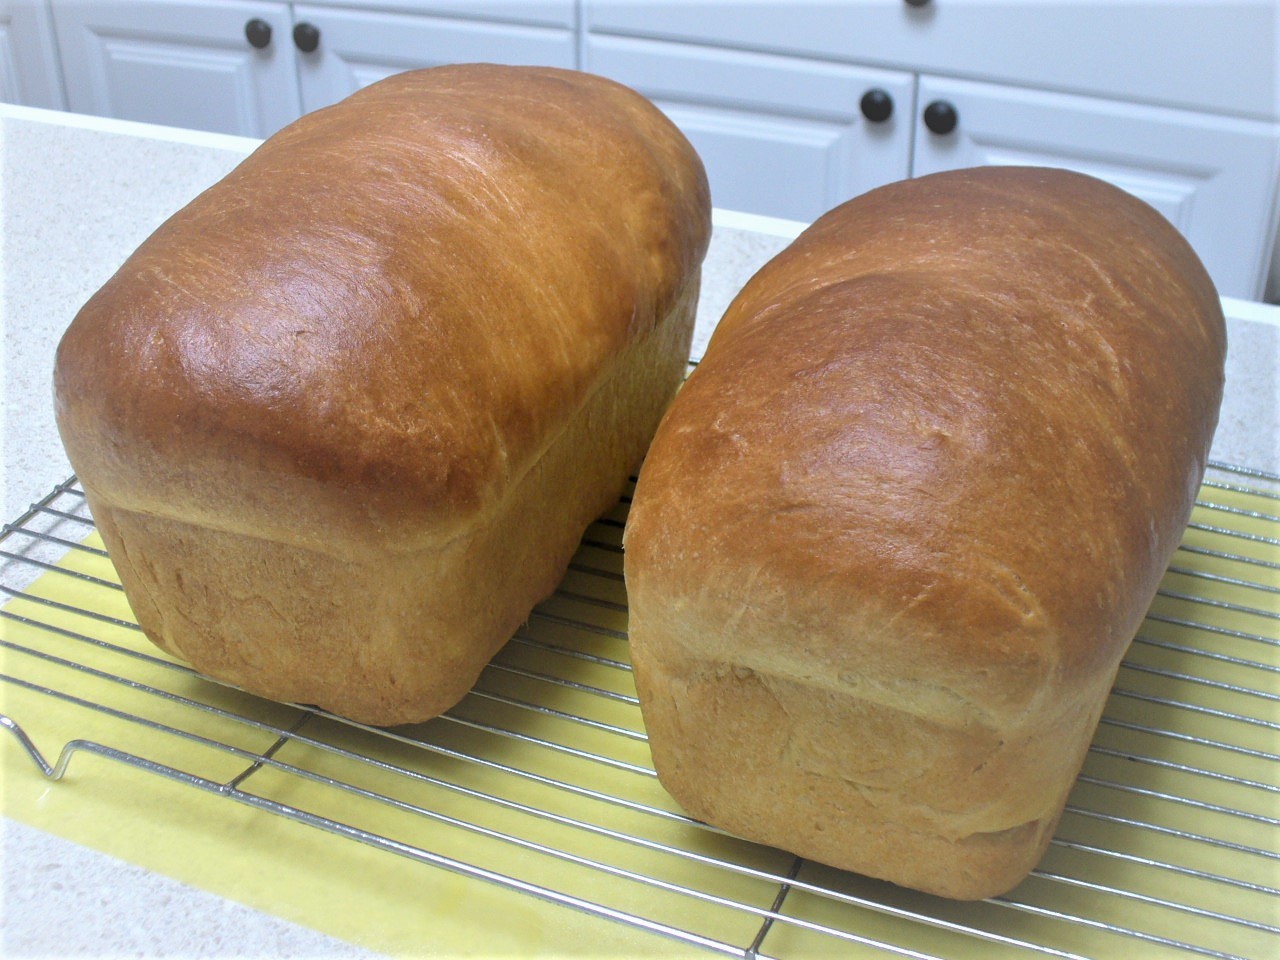
TESTING FOR DONENESS: When done, the loaves will have
shrunk slightly away from the sides of the pan, and they will be well browned.
If the sides and bottoms are soft and pale, the bread probably needs to bake a
bit longer; about 5 to 10 minutes longer.
COOLING THE BREAD: While warm from the oven bread
is a tasty temptation (and we have done
our share of being lured into temptation; LOL) the bread texture is best if
it cools before you slice it. Turn the loaves out of the pan and let them sit
on a wire rack for 2 to 3 hours. When completely cool, wrap each loaf in an
airtight plastic bag. For storage longer than a few days, refrigerate or freeze
the bread.
FREEZING YEAST BREAD: Homemade breads are among the
best things to keep in your freezer. If frozen properly, they will taste almost
freshly baked when reheated and served months later. The most important point
in freezing is to wrap the bread (whole
or sliced into individual slices) well and seal it thoroughly. An initial
covering with plastic wrap or a plastic bag, followed by a secure wrapping with
foil, gives the best protection. Label and date everything you freeze.
REHEATING YOUR YEAST BREAD: If you want to freshen or reheat
a frozen loaf of bread, there is no need to thaw it first.
Preheat the oven to 325-degrees. If you are
reheating a crisp-crusted loaf, remove the wrapping, place it on a baking
sheet, and heat for 20 to 30 minutes, depending on the size of the loaf. If it
is a soft-crusted loaf, unwrap it and brush away any ice crystals; then either
rewrap it in foil or place it in a brown paper bag with the top folded down to
seal, and heat for 20 to 30 minutes. To test if a loaf is thoroughly thawed,
stick a sharp knife into it and hold the blade there for a moment – if it comes
out cold, the bread needs more time in the oven.
You can also reheat bread to serve it warm at
the table. Portions of loaves (and small
muffins and buns) reheat best when sprinkled with a few drops of water and
wrapped loosely in a brown paper bag. Place in a preheated 325-degree oven for
10 to 15 minutes.
No comments:
Post a Comment