Wedding Song - God Knew That I Needed You

Showing posts with label knit. Show all posts

Sunday, August 7, 2022

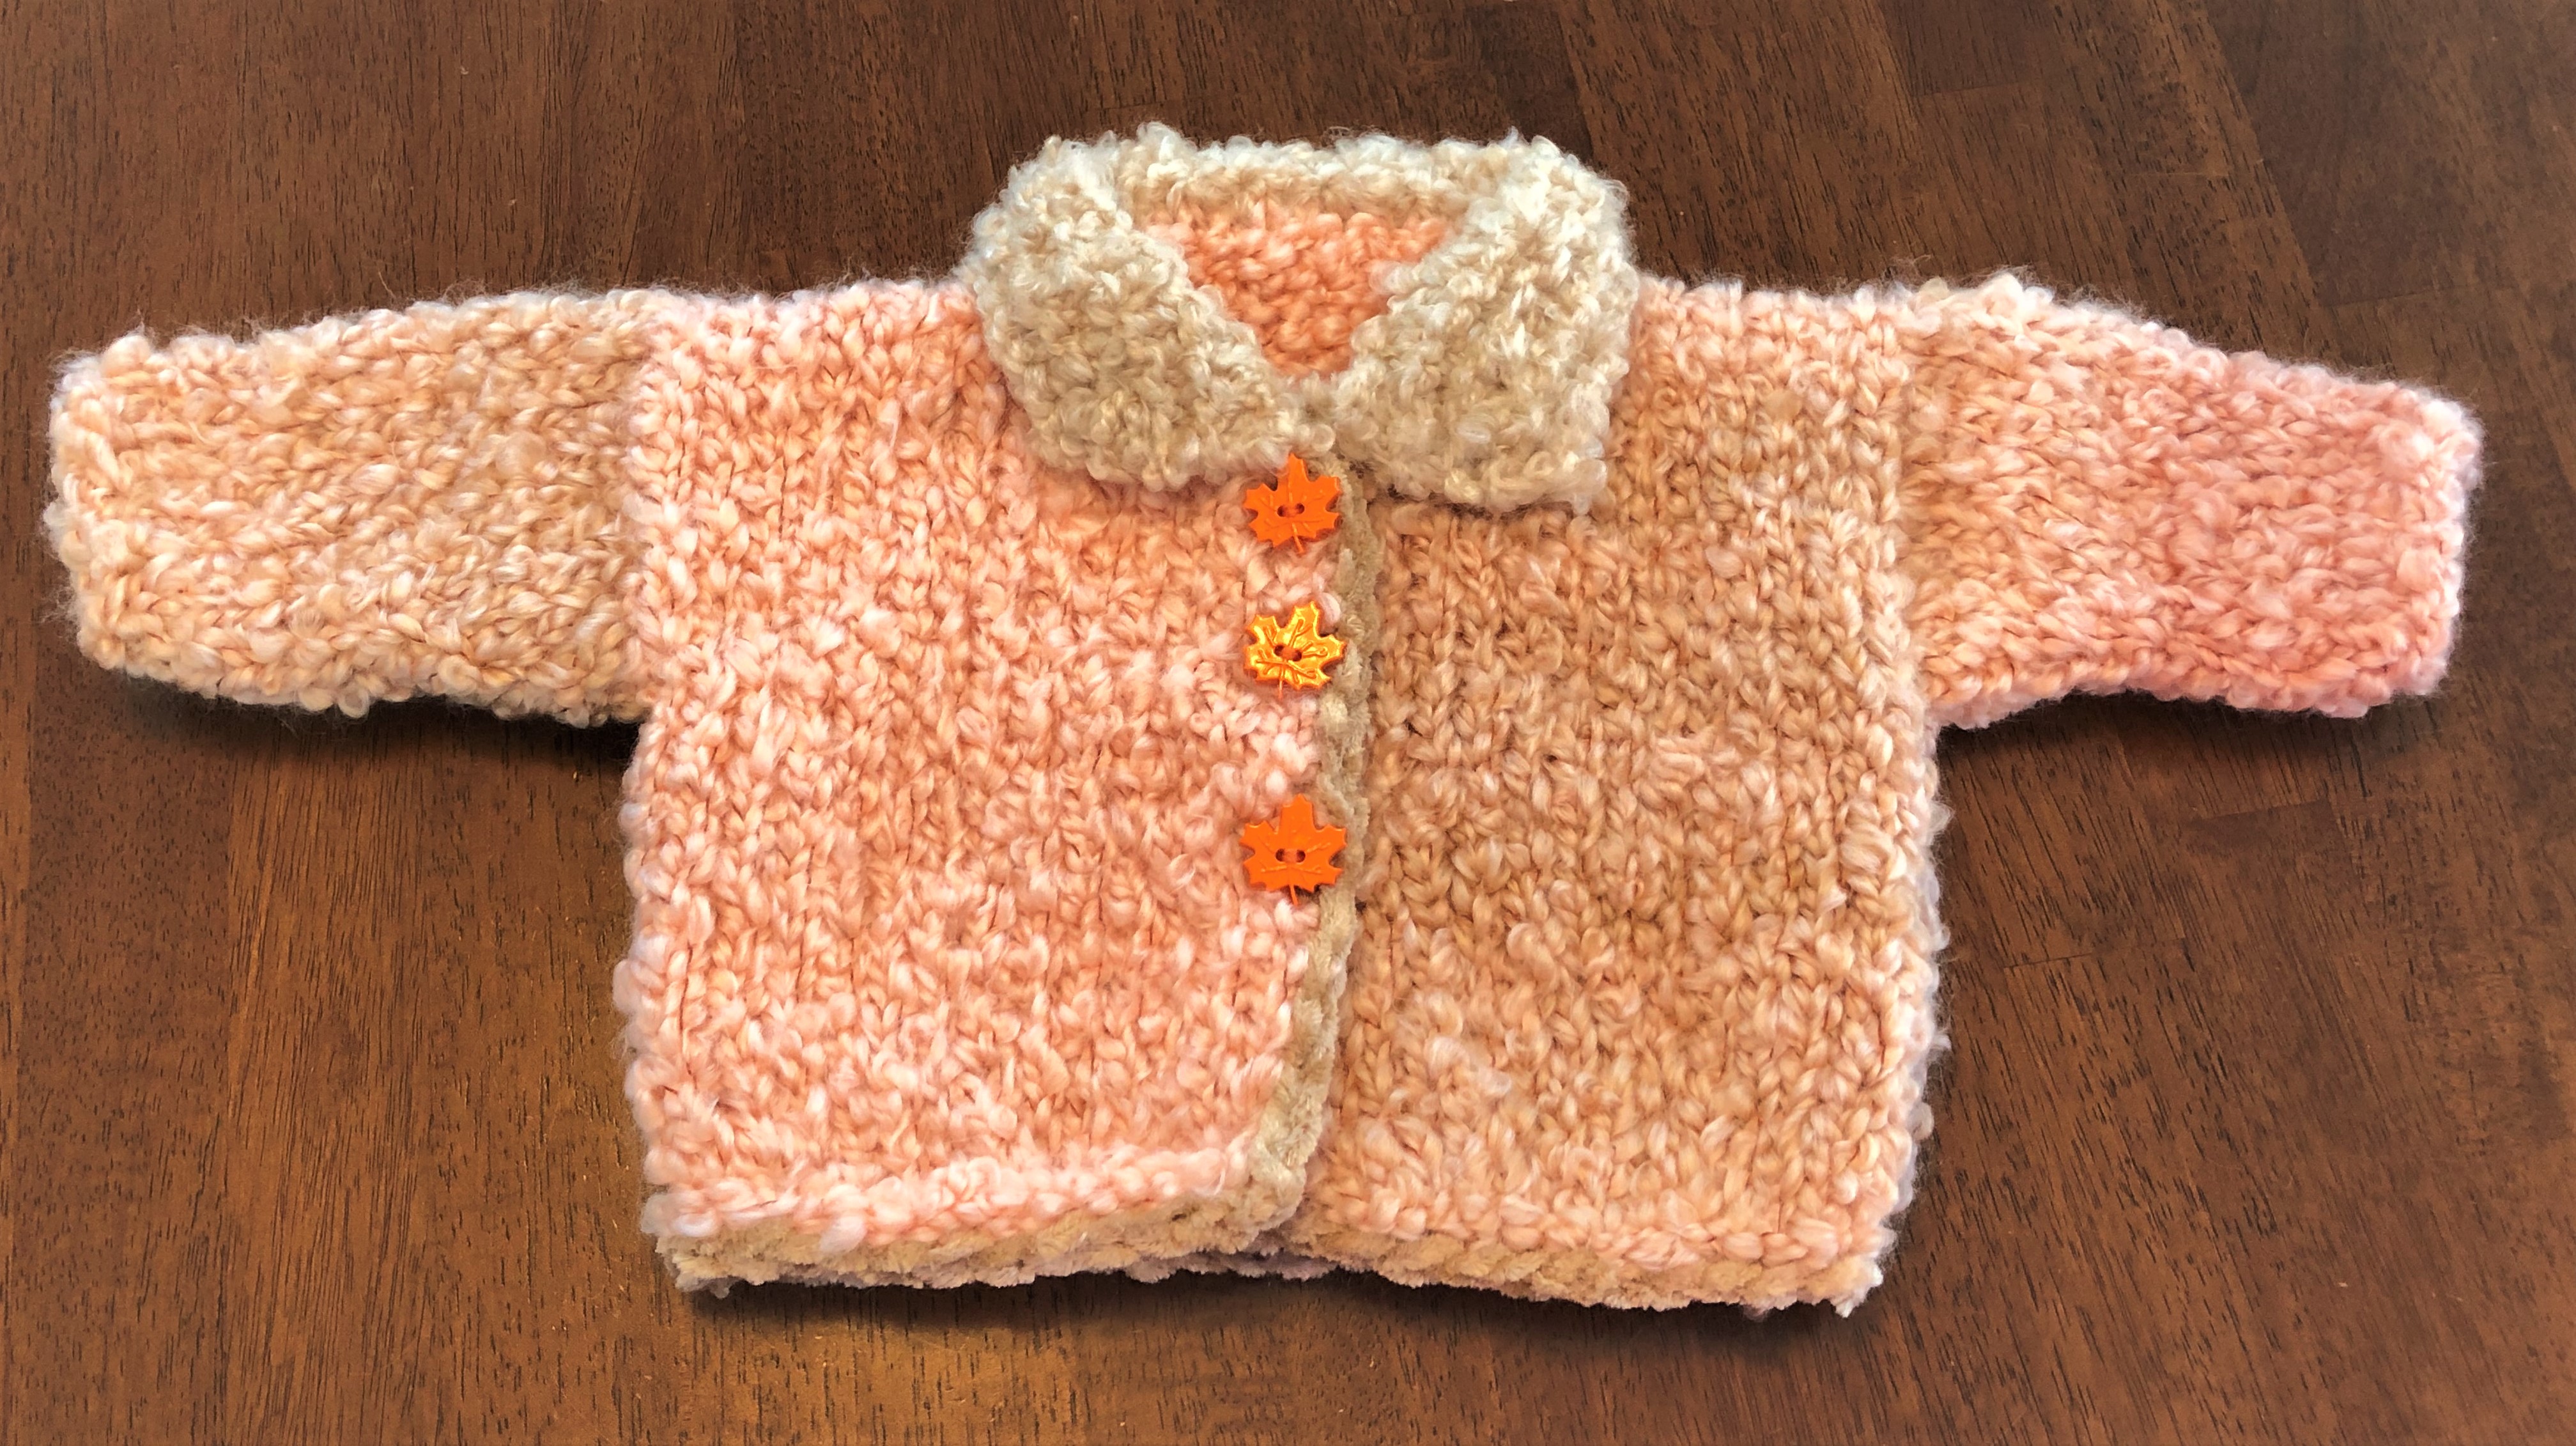
MOD BABY JACKET & EARFLAP HAT; NB-3 MO. GIRL; Knit – Bulky Weight Yarn

This baby jacket is a match for the previous baby jacket I designed, and posted 😊


Newly designed Jacket with Hat to match.

Materials: 200g of any brand Bulky Yarn (#5 weight) MC & CC; #11 knitting needles – straight; #L crochet hook; 3 medium stich holders; 4 pieces CC scrap yarn, about 3-inches in length; tapestry needle; elastic thread; 3 1” resin buttons

Size: NB to 3 MO

Terms Used:

MC = main color

CC = contrast color

CO = cast on

K = knit

P = purl

st st = stockinette st (knit 1 row – purl 1 row)

sl st = slip stitch (insert crochet hook in back loop and pull thread through, moving onto next st and repeating process)

inc = increase

dec = decrease

x = repeat pattern process

yo = yarn over

tog = together

EO = end off


Jacket Back: With MC, CO 26 st and work in st st fo 9½ -inches. Place 7 sts on a st holder (front)/12 sts (neck back) on a st holder/remaining 7 sts on last st holder (front).

Right Front (Buttonhole side; Girl): Slip sts of this holder onto needle; attach yarn and knit across 7 sts – increasing 2 sts at end of row. P next row. Continue in st st, and inc 2 sts every k row x3 (15 sts on needle). Now P 1 row & K 1 row. Begin to work BUTTONHOLES: K2, yo, k2tog for each buttonhole; make two more buttonholes in same manner, spaced 1½ -inches between.

Work even in st st, until entire piece measures 9½ -inches from shoulder. EO

Back of Neck: Leave sts on holder.

Left Front: K across 7 sts on holder. P next row & inc 2 sts at end of row. Continue in sts st, and inc 2 sts every p row x3 (15 sts on needle).

Work even in st st, until entire piece measures 9½ -inches from shoulder. EO

Sleeves: With scrap yarn bits, mark sleeve settings 4¼ -inches from shoulders (both sides of work). With #L crochet hook, pickup and knit 24 sts between marked area; work in st st on these sts for 4 rows – and dec 1 st of next row. Repeat dec every other row x3 (16 sts on needle). Work eve in st st until sleeve measures 5” from shoulder. EO

Repeat instructions on opposite side for second sleeve.

Remover scrap yarn markers and save for button placements.

Sew side and sleeve seams.

Collar: From front of work, pick up and k 30 sts along front & back necklines. P next row (underside of collar). Work in st st until collar measures 4”. With back of collar facing you, begin at right edge, and trim around collar a with MC sl st crochet edging. EO

Fold buttonhole front over plain front piece, and mark button placements by threading tapestry needle with a piece of scrap yarn and drawing yarn through center st showing through buttonhole hole … this will make an accurate button placement that lines up properly with buttonhole.

Hold jacket with Right Front side facing you, and with CC color, work a sl st edging around entire jacket body for a nice finish 😊 Sew buttons in place.

Finished! Homespun yarn, with Cashmere yarn edging.

Earflap Hat can be found at this link: https://melodys-makings.com/wp-content/uploads/2015/08/I-Cord-Earflap-Hat-Knitting-Pattern.pdf


Tuesday, August 2, 2022

MOD KNIT BULKY BABY JACKET & EARFLAP HAT ~NB-3 MO; BOY

The jacket is my own design; the earflap hat pattern, I found surfing the internet 😉

Jacket & Hat Set Completed; NB to 3 MO - BOY

A friends gave me an 'Itty-Bitty Knits for Baby booklet' a few years back, and it had a jacket pattern that looked interesting to me ... but I didn't like the garter st pattern (I wanted something a little softer, like what I designed the other night). I also thought softer shoulders (without bulky seams) would feel better on a little body – so I designed that, too. I like flatter collars, too: so that became a feature in my design.

Basically, I reworked the entire original pattern – and to be quite honest, I think my design looks better, and will feel better on a little baby body.

This pattern really is my own design. I haven't done anything other {designer's} don't do. Every designer builds on another's foundation: but they tweak the foundation to suit their own purposes.

I hope you enjoy this reworked pattern. I know I enjoyed working it ... and the next one will go a lot quicker, because I won't be working with needles in one hand, a vision before my eyes, and a pen in the other hand. Time will be significantly reduced, so I can't tell you how long it will take to knit the jacket – all I can say is I started after Supper, and that it was finished before bedtime ðŸ˜‰

You can complete the hat while watching your favorite movie ðŸ˜Š

Materials: 200g of any brand Bulky Yarn (#5 weight); #11 knitting needles – straight; #L crochet hook; 3 medium stich holders; 4 pieces CC scrap yarn, about 3-inches in length; tapestry needle; elastic thread; 3 1” resin buttons

Size: NB to 3 MO

Terms Used:

CC = contrast color

CO = cast on

K = knit

P = purl

st st = stockinette st (knit 1 row – purl 1 row)

inc = increase

dec = decrease

x = repeat pattern process

yo = yarn over

tog = together

EO = end off


Jacket and hat make up very quickly – you can have the set completed in a day’s time … a day and a half if you have a life outside of sitting and knitting 😊

Jacket Back: CO 26 st and work in st st fo 9½ -inches. Place 7 sts on a st holder (front)/12 sts (neck back) on a st holder/remaining 7 sts on last st holder (front).

Right Front: K across 7 sts on holder & inc 2 sts at end of row. P next row. Continue in sts st, and inc 2 sts every k row x3 (15 sts on needle).

Work even in st st, until entire piece measures 9½ -inches from shoulder. EO

Right Front Neck Shaping.

Back of Neck: Leave sts on holder.

Left Front (Buttonhole side; boy): Slip sts of this holder onto needle; attach yarn and knit across 7 sts. P next row – increasing 2 sts at end of row. Continue in st st, and inc 2 sts every p row x3 (15 sts on needle). Now K 1 row & P 1 row. Begin to work BUTTONHOLES: K2, yo, k2tog for each buttonhole; make two more buttonholes in same manner, spaced 1½ -inches between.

Left Front Shaping & Buttonholes - Boy.

Work even in st st, until entire piece measures 9½ -inches from shoulder. EO

Sleeves: With scrap yarn bits, mark sleeve settings 4¼ -inches from shoulders (both sides of work). With #L crochet hook, pickup and knit 24 sts between marked area; work in st st on these sts for 4 rows – and dec 1 st of next row. Repeat dec every other row x3 (16 sts on needle). Work eve in st st until sleeve measures 5” from shoulder. EO

Repeat instructions on opposite side for second sleeve.

Jacket Body & sleeves completed.

Remover scrap yarn markers and save for button placements.

Sew side and sleeve seams.

Collar: From front of work, pick up and k 30 sts along front & back necklines. P next row (underside of collar). Work in st st until collar measures 4”. EO

Starting Collar; purl sts on backside; st st on front side, to be turned down when finished.

Fold buttonhole front over plain front piece, and mark button placements by threading tapestry needle with a piece of scrap yarn and drawing yarn through center st showing through buttonhole hole … this will make an accurate button placement that lines up properly with buttonhole.

MOD Jacket FINISHED!
Original Design – I really do think my design is more appealing …

Earflap Hat can be found at this link: https://melodys-makings.com/wp-content/uploads/2015/08/I-Cord-Earflap-Hat-Knitting-Pattern.pdf

Saturday, April 9, 2022

MOD HUMMINGBIRD KITCHEN TOWEL; Knit

I started this towel yesterday – and finished this morning, along with a matching dishcloth.

I'm pleased with how my kitchen towel design turned out.

I chose a hummingbird grid – drew it freehand … and chose my towel colors based on a pink fuchsia flower 😊

Now, with the tempestuous weather happening outside, is the perfect time to drink coffee and be creative 😉

Freehand Grid; patterns found on Pinterest.
Fuchsia plant.

Normally, I work my patterns in jacquard knit (knitting a pattern directly into the fabric of knit work), but cotton yarn is a lot stiffer than acrylic worsted and jacquard tends to look messy with cotton yarn; so when I use cotton yarn I usually opt to use the duplicate stitch embroidery for design purposes because it stays put when the damp cotton yarn “grows”. Cotton yarn is good for dishtowels because it wicks moisture off hands and dishes (if you handwash/hand dry dishes); but it tends to lose shape when it gets very damp with constant use. Even so – I prefer my handmade cotton towels over the recycled plastic fiber kitchen towels sold in stores that are basically worthless other than the cute designs stamped on them.

I’m not a fan of the duplicate stitch stich … but it seems the best technique to do a broad-span design on cotton yarn projects: it “sets” the pattern to keep it in place.

This pattern combines knit, crochet, and embroidery stitches.

Here’s the pattern –

MOD HUMMINGBIRD KITCHEN TOWEL

1 skein Cotton yarn in Pink, Green & White; small amount of contrasting color throwaway yarn; Worsted yarns in Green and White.

# 9 knitting needles

#I/9 crochet hook

1 resin button for towel topper

1 tapestry needle

1 set of plastic cone-shaped needle point protectors/stoppers

Terms used:

CO = cast on sts

St = stitches

st. st. = stockinette stitch

tog = together

sc = single crochet

dc = double crochet

EO = end off yarn


With pink, CO 70 sts & K 1 row.

Work 62 rows in stockinette stitch (knit 1 row = front side of work; purl 1 row = back side of work).

Keep sts on needle, and slip a point stopper on the tip end when row 62 is finished (this will be the purl side of work).

Lower end of kitchen towel finished.

With a small amount of throw away yarn, mark off the center 20 sts needed for the hummingbird embroidery design.

My pattern grid was marked like this: count 20 rows from the bottom – and 25 sts on each end of the center 20 design sts; there should be 23 top-end rows.

Once you have your st counts set up, start the Duplicate St embroidery using the tapestry needle and contrasting yarn colors: this online page describes it (https://www.thesprucecrafts.com/how-to-duplicate-stitch-2116380).

It’s pretty simple to do.

Using Duplicate St ...
Hummingbird finished.

When your design is finished, weave in the loose ends; and start on the towel topper.

Towel Topper – Row 63: With crochet hook, attach green yarn and sc across row as follows – *sc 2, sc 2 tog*, end sc 2. Ch 1, turn.

Repeat row 63 once more.

Next row and every row afterwards: Decrease one st EA end, until there are only six sts remaining to be worked.

Dc for 8 rows.

Button keyhole: Sl st next 3 sts; ch 6 and sl st in same sp; sl at to end. Turn.

Dc x12 in chain loop; EO.

Add a decorative loop edging of your choice (or leave plain).

With tapestry needle, sew button in place and weave in loose ends.

Trim your towel with a pretty edging, if that is something you want to do: I did, because I designed my towel after a frilly flower and a flighty bird. LOL

My towel looks stiff, but both yarns will soften with the first washing.

Knit kitchen towel with crochet topper & trim.

==KNIT DISHCLOTH

I’ve had this dishcloth pattern since the early 1980’s when it had been printed in the local newspaper; it’s easy to work up, and looks good either plain or 2-toned, as I am prone to do 😉

Knit Garter St Dishcloth pattern.
MOD Hummingbird Dishtowel Set completed.

Enjoy!

Tuesday, March 1, 2022

RAIN

I set the alarm clock last night to make sure I’d be awake and alert for the car maintenance appointment in Kelso, this morning. I woke up to a flood warning.

A 'what to do' kind of morning ...

I had to make that appointment – there was no way to cancel it, short of making the drive … and if I had to make the drive, I might as well keep the appointment. I mentally drove the route I thought would be the safest route; and then got myself ready to face the day.

The electricity went out just as I was getting ready to brush my hair into shape (I prayed it wasn’t a blown fuse); I needed to get my hair brushed/sprayed into shape before it lost its curling iron swank … so I quickly padded down the hallway to the spare bath, where the skylight would give me the necessary light, I needed to get the tricky job done. Halfway down the hallway, I heard the forced heat kick in, and breathed a genuine sigh of relief (‘Thank You, Yeshua!’; lights out was due to the weather and not the fuse box) as I pivoted and headed back to the master bath.

And I also thanked the Lord for whoever created curling gel! My baby fine hair needs all the help it can get when nature works against it 😉

Dabbing my lips with a bit of lipstick, I hoped that early morning snafu was not an indication of how the rest of the day was going to go.

Heading over to Kelso, where flooding warnings are in effect.
Dick Hannah's Toyota via #432 & Talley Way; no flooding enroute.

I was early as I made the Talley Way curve, so I decided to nip over to the Chef’s Warehouse Store and grab some aluminum foil: BIG rolls are sold there, and that works best for me. I use a lot of foil when baking my freezer meals 😉

Getting that roll of foil was not as easy as it usually is.

Count Crew working on the Kelso gas line & traffic held up; Talley way.
Held hostage by STOP sign, with nowhere to go ... in a puddle nearly up to the bottom of the driver's door.

I was waylaid by floodwaters of a different sort, as county maintenance workers were working on a gas line ☹ I hope that flooded pothole I was forced to pass time in, gets fixed, as well.

Finally allowed to creep forward and enter the store’s parking lot, I checked the time (still safe to grab the foil); entered the store, and found the relocated item.

I heard Eric Burdon singing over the intercom, and practically danced up the aisle … the happy feet urge to dance stopped when I saw the sticker tag on the aluminum foil – a $50 dollar increase! Ow, a serious economic pinch.

Eric Burdon – ‘Spill The Wine’ song:(https://www.youtube.com/watch?v=3i0DMbCKnAg)

Song Meaning Explained (https://medium.com/the-riff/eric-burdons-baffling-spill-the-wine-explained-18f9bc4b41d9)

I needed the foil – but not at the $$ increase: I bought two smaller rolls for the price I usually pay ($25/roll). I know I can buy cheaper foil, but this store sells industrial strength foil like restaurants use for cooking. That’s what I want.

Foil bought and stored in the car, I backtracked through the flooded pothole to make my scheduled appointment. If the brakes were flooded, I prayed I would not need to apply them until I reached the maintenance shop.

As I neared the shop’s entrance, I had a winged visitor touch down on the hood of the car; I hoped it would leave me alone when I parked and exited the vehicle.

I am deathly allergic to bees, wasps, yellowjackets, and hornets: one sting, and I’ll be a goner if I can’t get to a medical facility fast enough. A normal anaphylactic reaction can occur in a 2-hour span of time … I will get nauseous and swell up immediately at the bite mark, my heart rate accelerates and my throat will start to close in a matter of minutes; for me a bee sting really is ‘death on wings’. I do carry Benadryl at all times, “just in case”. And I rely heavily on Elohim’s mercy.

I also admit that tiny winged thing made me nervous as I cut the motor.

I couldn’t believe my eyes when this tiny winged death machine touch down; Dick Hannah, Kelso.
Yellow-legged Bee - Calliopsis andreniformis
The cute little killer is a few weeks early; Spring 2022 doesn’t ‘spring’ until March 20th.

I managed to exit the Highlander safely 😊

Pretty quiet in the Lobby this afternoon ...
Passing the time; I’m still working on the book I started a month-half ago. I’ve been so busy lately, during the week.

They Shop Crew had my modern chariot ready to roll in about 1½-hours’ time. And I was right, when I said last week, that $300 of the $500 price would go towards labor. But, I’m glad it’s a safe ride, now 😉

Bob would instinctively know about this ‘tip-top shape’ stuff: I’m learning.

Driving back towards home through town, I decided to top the gas tank off; it really didn’t need much gas, but I like to keep the tank full at all times.

I also deposited Bob’s Love Gift provisional beneficiary IWA check at the bank. It won’t significantly offset the $500 drain forked out this afternoon … but it is welcome, and I am thankful.

A little color showing as the gray clouds part; Lowe's.
The political pinch has arrived ...

$4/gal. gas price will continue to escalate as the obama-biden cartel forces it’s ‘european model’ political agenda (https://thehill.com/opinion/white-house/595706-biden-not-putin-to-blame-for-higher-gas-prices)

Oz’s Strawman Brain Song:

I turned towards Pacific Way; and hoped the road would be relatively dry: it was.

Driving Pacific Way Road, I saw that the slough waters were definitely above the flood level; and I was hoping, as I eyed the significantly high water, that the nesting sites for ducks had not been damaged. I hope there will be baby ducks this year … I enjoy watching them at various locations, as I hike along the Pacific Way Trail 😊

High water along Pacific Way.
Flooding Coal Creek Slough.
High & muddy; Pacific Way.

Nesting Mallard Ducks: https://www.rspb.org.uk/makeahomeforwildlife/advice/helpingbirdstest/nestingmallards/

Waterfowl Nesting Period: https://www.ducks.org/conservation/waterfowl-research-science/understanding-waterfowl-the-nesting-period

Entering the Park, I collected my mail, admired my blooming daffodils, switched out the furnace filter, and paid bills – all to the backbeat of falling rain.

So far, the only flooding I have fallen victim to today, was that flooded pothole on Talley Way 😉 I hope it stays that way.

A little early season color showing at home.
I'm going to plant Hens & Chicks sedums along the fence line - I have a LOT; they’ll spread like wildfire and fill in the area nicely.
The price of Aluminum Foil has gone through the roof!
Trying the newer filter today ...

As daylight fades, I’m going to sit back and relax while the rain tap-dances across my roof and swirls down the drainpipe. I’m going to find old black-n-white movies on YouTube to enjoy; and try to finish up my latest knitting project 😉

MOD latest Angel Baby Blanket Design - halfway mark.